Sequelize로 CRUD 수행하기 (Rest Client)
✒️ 2025-05-26 15:06 내용 수정
사전 설정
- server.js 설정
- express, nodemon, ejs, sequelize, sequelize-cli 설치
- express에서 public 경로 설정
- view engine으로 ejs 설정
- express에서 json 설정
- express에서 urlencoded 설정
- sequelize 설정
// 1. require
const express = require('express');
const app = express();

//db
const db = require('./models/index');
const employee = require('./models/employee');
const { Employee } = db;

// 2. use, set
app.use(express.static(__dirname + '/public'));
app.use(express.static(__dirname + '/public/js'));
app.set('view engine', 'ejs');
app.use(express.json());
app.use(express.urlencoded({'extended':'true'}));

// 3. listen
// rest client를 사용했을 때 8080 포트로 연결이 안되서 변경함
app.listen('3000', () => {
    console.log('접속 http://localhost:3000');
});

// 4. routing
app.get('/', (request, response) => {
    response.render('main.ejs');
});
- VSC에서 상단 메뉴 바의 View - Extensions에 들어가서 rest client를 설치한다.
- VSC 환경 설정#플러그인 설치 참고.
- Rest Client로 VSC에서 HTTP request를 보내 확인할 수 있다.
1. 데이터 조회
- server.js 파일에서 데이터 조회를 위한 get 라우팅을 설정한다.
// 데이터 조회
// /employee?team=teamValue 와 같은 형식으로 query string의 정보를 받아 출력
app.get('/employee', async (request, response) => {
let { team } = request.query; // query string에서 team이라는 key의 value를 저장
let { position } = request.query; // query string에서 position이라는 key의 value를 저장
let { id } = request.query; // query string에서 id라는 key의 value를 저장
if (team) { // query string의 key가 team이라면
const employeeTeam = await Employee.findAll({where:{team}}); // SELECT * FROM EMPLOYEES WHERE team = teamValue
response.render('employee.ejs', {employee : employeeTeam});
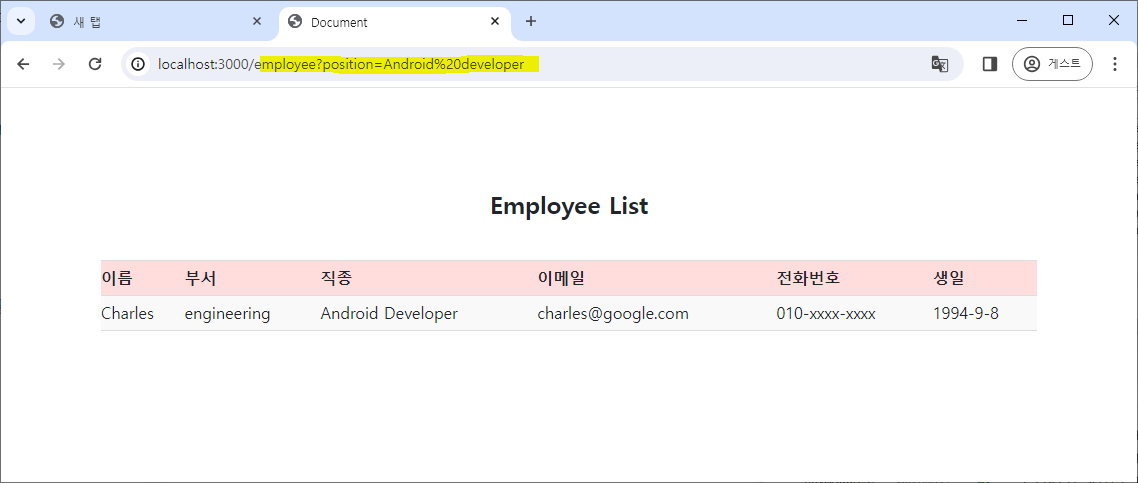
} else if (position) { // query string의 key가 position이라면
const employeePosition = await Employee.findAll({where:{position}}); // SELECT * FROM EMPLOYEES WHERE position = positionValue
response.render('employee.ejs', {employee : employeePosition});
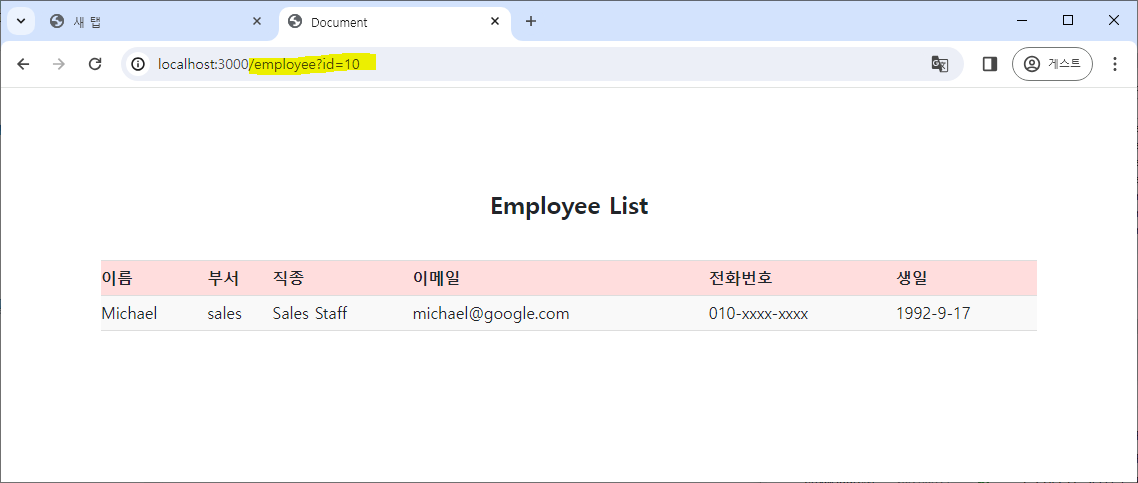
} else if (id) { // query string의 key가 id라면
// Model.findOne()의 반환은 단일 객체다.
let employeeOne = [await Employee.findOne({where : {id}})]; // findAll을 써도 무관(ejs에서 띄울 때 배열이냐 아니냐가 중요)
// SELECT * FROM EMPLOYEES WHERE id = idValue
response.render('employee.ejs', {employee:employeeOne});
} else {
const employee = await Employee.findAll(); // SELECT * FROM EMPLOYEES
response.render('employee.ejs', {employee : employee});
}
});
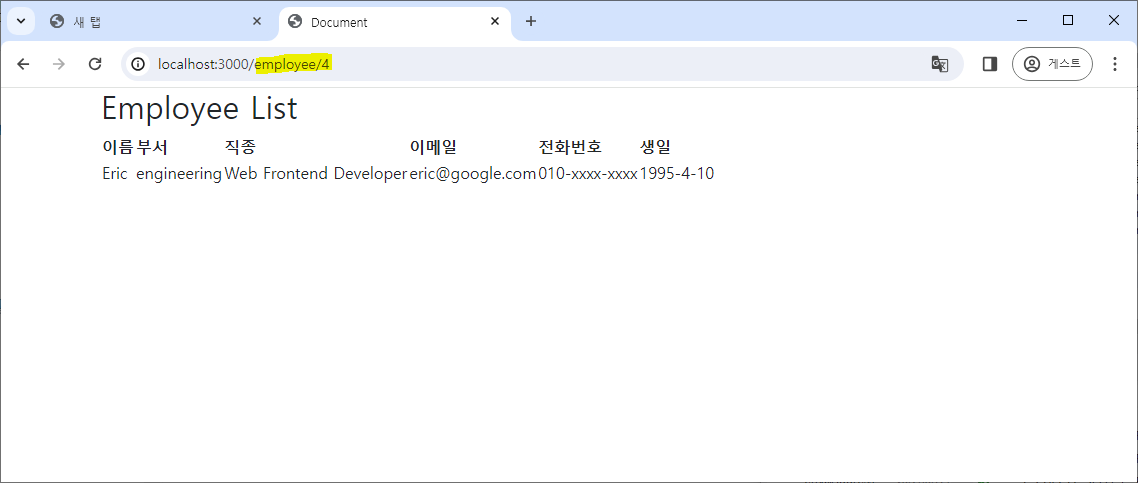
// request의 parameter (/employee/param)으로도 데이터를 조회할 수 있음
app.get('/employee/:id', async (request, response) => { // 몇몇 사이트에서는 파라미터로 페이지들이 구분됨
let { id } = request.params;
let employeeOne = [await Employee.findOne({where : {id}})];
if(employeeOne) {
response.render('employee.ejs', {employee:employeeOne});
} else {
response.status(404).send({message : "Employee is not found."}); // 에러 메시지를 띄움
}
});
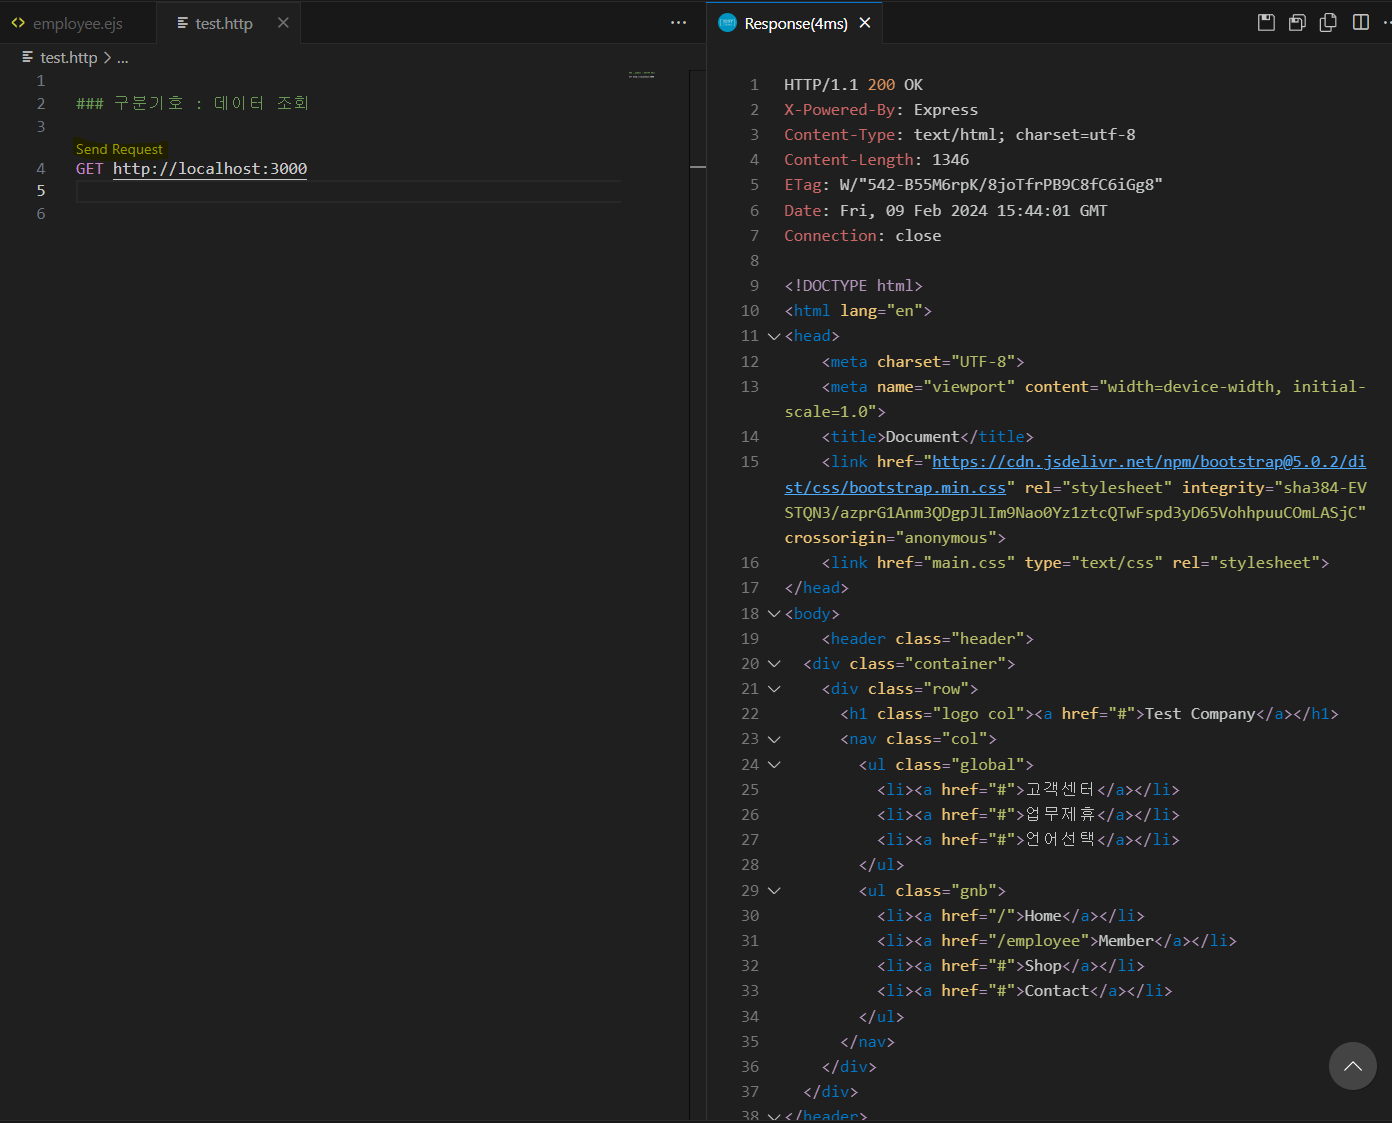
- http 파일에서도 GET을 사용해서 웹 사이트 연결을 확인할 수 있다.
- 메소드와 url을 설정한 후 바로 위에 뜨는 Send Request 글자를 클릭해서 연결을 바로 확인할 수 있다.
- port 8080으론 연결이 잘 안되서 3000으로 변경하여 실습했다.
### 구분기호 : 데이터 조회

GET http://localhost:3000
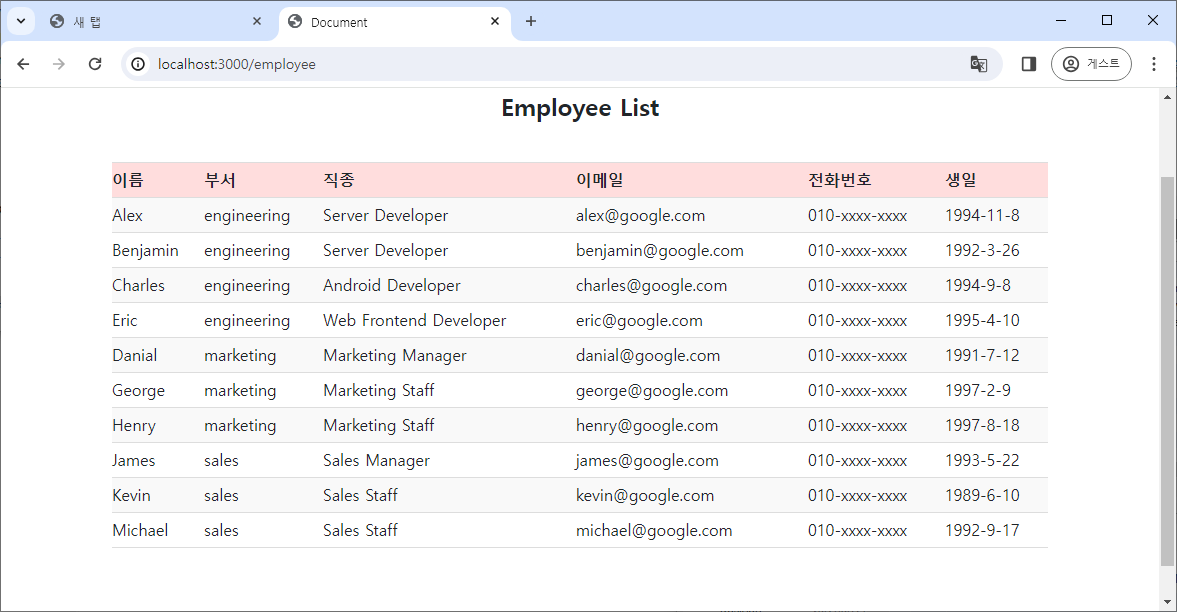
- DB에서 가져온 데이터를 보여줄 .ejs 파일의 페이지를 html로 작성한다.
- ejs를 사용하기에 스크립트 태그를 사용해서 가져온 데이터를 출력한다.
- JSP 태그#스크립트 태그, EL(Expression Language) 참고.
<!DOCTYPE html>
<html lang="en">
<head>
    <meta charset="UTF-8">
    <meta name="viewport" content="width=device-width, initial-scale=1.0">
    <title>Document</title>
    <link href="https://cdn.jsdelivr.net/npm/bootstrap@5.0.2/dist/css/bootstrap.min.css" rel="stylesheet" integrity="sha384-EVSTQN3/azprG1Anm3QDgpJLIm9Nao0Yz1ztcQTwFspd3yD65VohhpuuCOmLASjC" crossorigin="anonymous">
    <link href="main.css" type="text/css" rel="stylesheet">
</head>
<body>

    <section class="sec employee">
        <div class="container">
            <h2 class="title">Employee List</h2>
            <div class="row">
                <div class="col">
                    <div class="info-box">
                        <table>
                            <tr>
                                <th>이름</th>
                                <th>부서</th>
                                <th>직종</th>
                                <th>이메일</th>
                                <th>전화번호</th>
                                <th>생일</th>
                            </tr>
                            <tr>
                                <% for(let i = 0; i < employee.length; i++) {
                                        let date = new Date(employee[i].birthday);
                                        let birthday = `${date.getFullYear()}-${date.getMonth()+1}-${date.getDate()}`;
                                %> <!-- DB에서 가져온 날짜 형식이 매우 길어서 Date 클래스를 사용해 보기 편하게 변경한다 -->
                                    <tr>
                                        <td> <%= employee[i].name %> </td>
                                        <td> <%= employee[i].team %> </td>
                                        <td> <%= employee[i].position %> </td>
                                        <td> <%= employee[i].emailAddress %> </td>
                                        <td> <%= employee[i].phoneNumber %> </td>
                                        <td> <%= birthday %> </td>
                                    </tr>
                                <% } %>
                            </tr>
                        </table>
                    </div>
                </div>
            </div>
        </div>
    </section>

    <script src="https://cdn.jsdelivr.net/npm/bootstrap@5.0.2/dist/js/bootstrap.bundle.min.js" integrity="sha384-MrcW6ZMFYlzcLA8Nl+NtUVF0sA7MsXsP1UyJoMp4YLEuNSfAP+JcXn/tWtIaxVXM" crossorigin="anonymous"></script>
</body>
</html>
- css도 추가한다.
- 실습 시간에 했던 내용을 그대로 사용했다.
.sec{width: 100%;padding: 100px 0;}
.sec .title{margin: 0 0 40px; font: bold 24px 'inherit'; text-align: center;}

.employee table{width: 100%; border-spacing: 0; border-collapse: collapse; border-bottom: 1px solid #ddd;}
.employee th,
.employee td{border-top: 1px solid #ddd; padding: 5px 0;}
.employee th{background-color: #fdd;}
.employee table td.email{text-align: left;}

/* 테이블 중 홀수번째 줄만 색을 변경*/
.employee tr:nth-of-type(2n-1){background-color: #f9f9f9;}
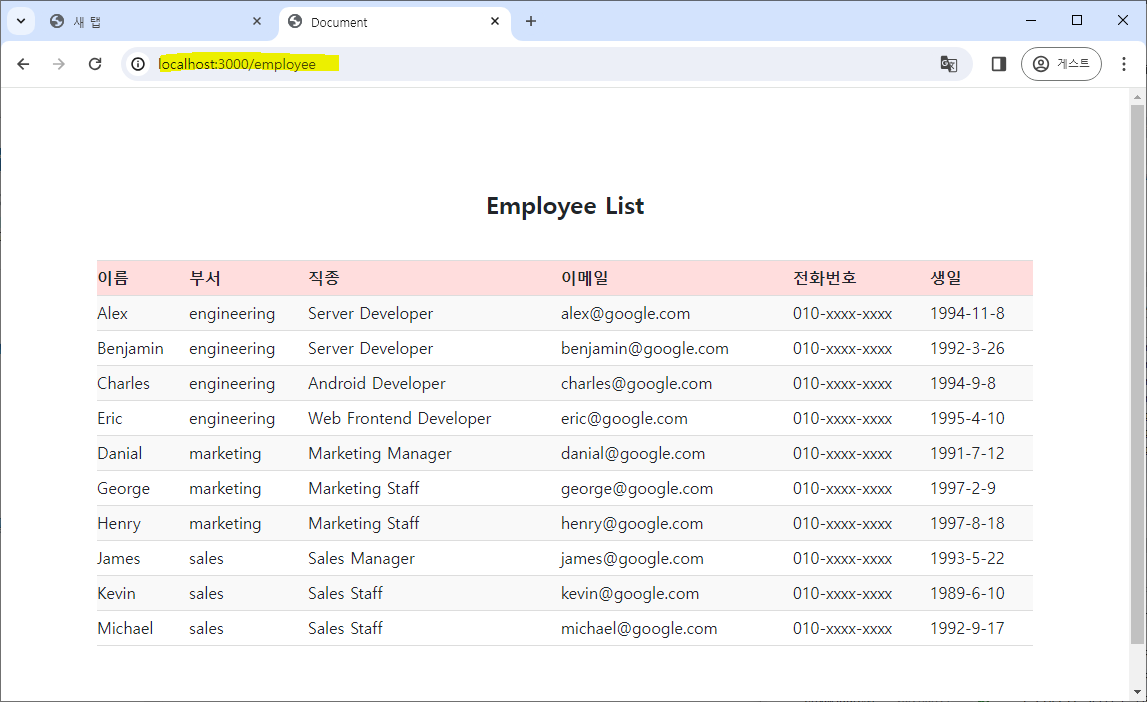
- url에 /employee만 입력하면 전체 직원을 조회하여 출력한다.
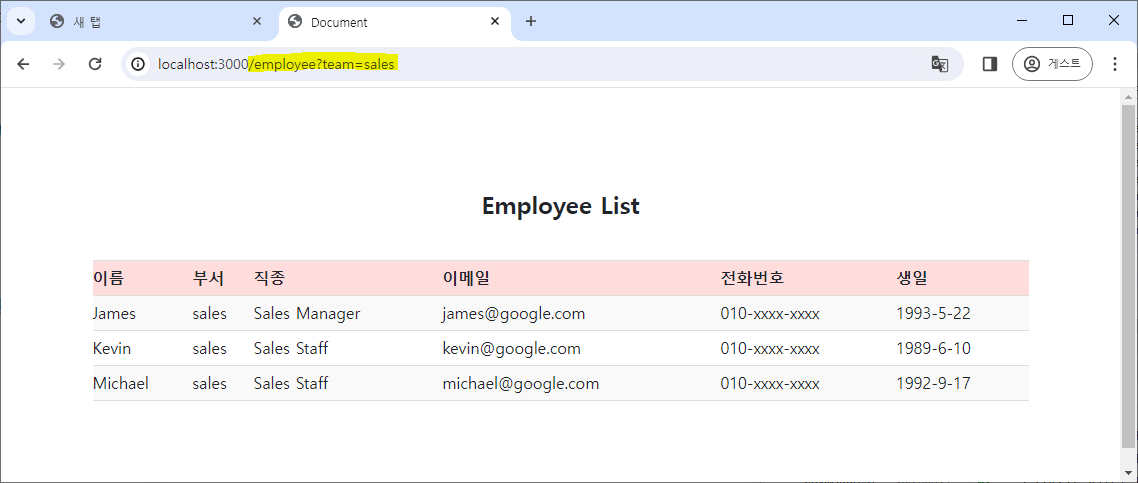
- url에 /employee?key=value로 query string의 key와 value를 전달하면 해당 조건의 직원을 조회하여 출력한다.
- url에 /employee/param으로 파라미터를 전달하면 해당 파라미터를 라우팅에서 받아 조건에 맞는 직원을 조회하여 출력한다.
- 다른 페이지로 판정되는 건지 css가 적용되지 않았다.
- 20240214 오류 해결 : server.js 파일에서
app.use(express.static(__dirname + '/public'));를 작성하고, ejs 파일에서<link href="main.css" type="text/css" rel="stylesheet">를 작성 시href="main.css"에서 파일 이름 앞에/를 생략하면 잘 적용된다.- js 파일을
<script>태그로 적용할 때도 동일하다.
- js 파일을
2. 데이터 추가
- server.js에서 데이터 추가를 위한 post 라우팅을 설정하며, 2가지 방법이 있어 상황에 따라 하나를 선택해 사용한다.
- Model query#INSERT 참고.
Model.build()와save()사용
// 데이터 추가
app.post('/employee', async(request, response) => {
    const newEmployee = request.body; // request의 body의 내용을 가져옴
    const employee = Employee.build(newEmployee); // 새 data 추가
    await employee.save(); // data 저장

    response.render('employee.ejs', {employee});
});
Model.create()사용
// 데이터 추가
app.post('/employee', async(request, response) => {
    const newEmployee = request.body;
    const employee = await Employee.create(newEmployee); // build + create

    response.render('employee.ejs', {employee});
});
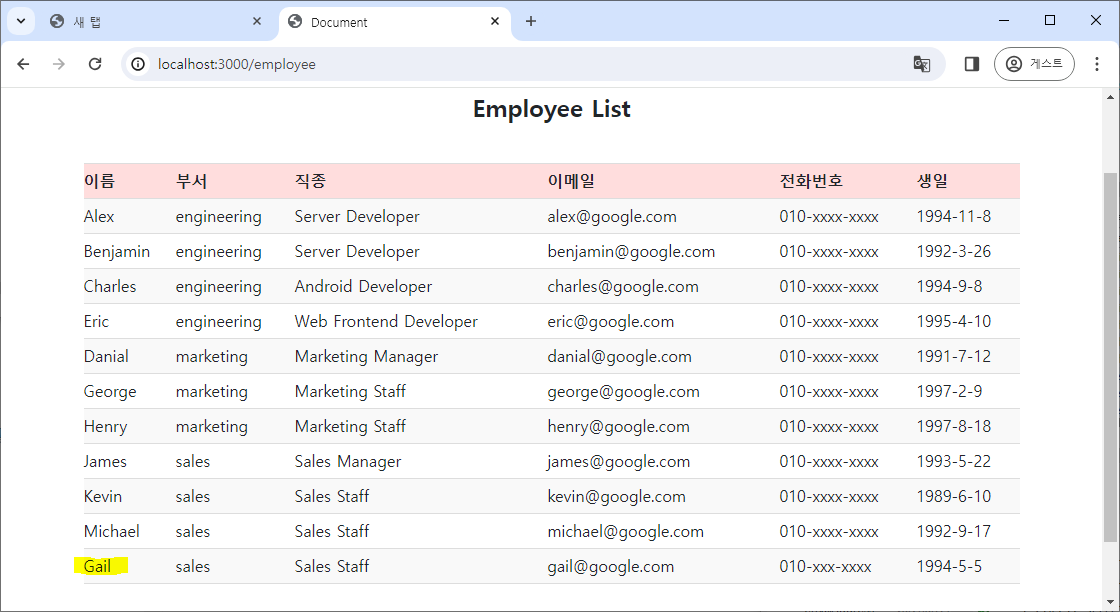
- http 파일에서 데이터 추가를 위한 테스트용 request body를 작성한다.
### 데이터 추가 : server.js에 추가한 라우팅 경로로 이동해서 작동함

POST http://localhost:3000/employee
Content-Type : application/json

{
    "name" : "Gail",
    "team" : "sales",
    "position" : "Sales Staff",
    "emailAddress" : "gail@google.com",
    "phoneNumber" : "010-xxx-xxxx",
    "admissionDate" : "2022/01/06",
    "birthday" : "1994/05/05",
    "profileImage" : "profile3.png"
}
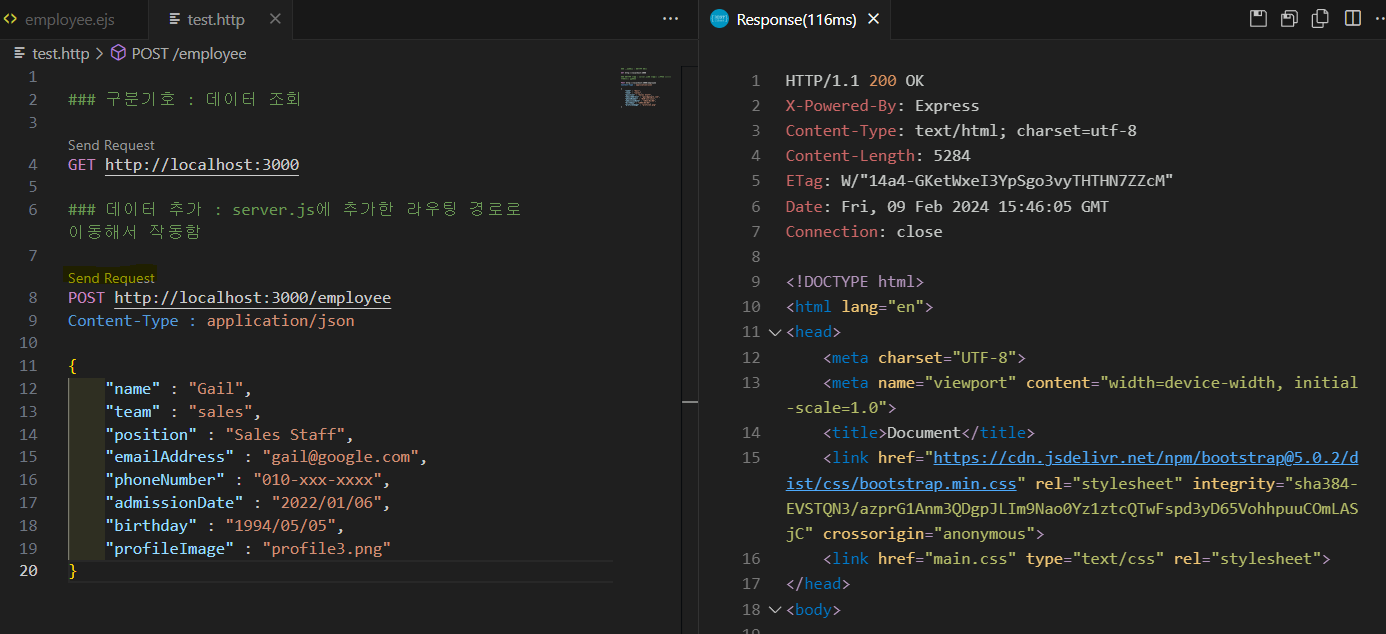
- 페이지에서 전체 직원을 조회하면 추가된 직원을 확인할 수 있다.
3. 데이터 수정
- 데이터 수정을 위한 put 라우팅을 설정한다. 2가지 방법이 있어 상황에 따라 사용한다.
- Model query#UPDATE 참고.
Model.update()를 사용해서 수정- Model.update()의 반환 값의 여부로 성공 및 실패를 판단할 수 있다.
- JSP(PreparedStatement의 executeUpdate())과 Spring(SqlSession의 update())도 반환값의 여부로 DB에 데이터가 잘 수정되었는지 확인할 수 있었다
- JSP로 DB 데이터 CRUD 실행#3. DAO 수정, Mybatis 연동하기#DB에서 데이터 조회하기 참고.
// 데이터 수정
app.put('/employee/:id', async (request, response) => {

    const { id } = request.params; // request의 parameter를 가져옴
    const newInfo  = request.body; // request의 body를 가져옴
    const result = await Employee.update(newInfo, {where:{id}}); // 특정 조건에 맞는 행의 필드들을 수정

    if (result[0]) {
        response.send({message : `${result[0]} row(s) affected`}); // 수정이 잘 되었다면 성공 메시지
    } else {
        response.status(404).send({message : `Employee is not found`}); // 실패했다면 error 메시지
    }
});
Model.findOne()으로 데이터를 찾고, 객체의 properties를 새로 저장
// 데이터 수정 2
app.put('/employee/:id', async (request, response) => {

    const { id } = request.params;
    const newInfo  = request.body;
    const employee = await Employee.findOne({where:{id}}); // 수정할 행의 정보를 가져옴

    // newInfo 객체 내의 모든 순회 가능한 property와 method를 String 배열로 반환
    Object.keys(newInfo).forEach((prop) => {
        employee[prop] = newInfo[prop] // property의 내용을 새 value로 저장
    });

    await employee.save(); // 변경 내용을 저장
    response.send(employee);
});
- http 파일에서 데이터 수정을 위한 테스트용 request body를 작성한다.
- server.js에서 request.params을 받아 수정하는 방법으로 작성했기 때문에 PUT의 url에 params을 추가해야 한다.
### 데이터 수정

PUT http://localhost:3000/employee/11
Content-Type : application/json

{
    "name" : "Gail",
    "team" : "sales",
    "position" : "Sales Staff",
    "emailAddress" : "gaaaa@google.com",
    "phoneNumber" : "010-xxx-xxxx",
    "admissionDate" : "2022/01/06",
    "birthday" : "1994/05/05",
    "profileImage" : "profile3.png"
}
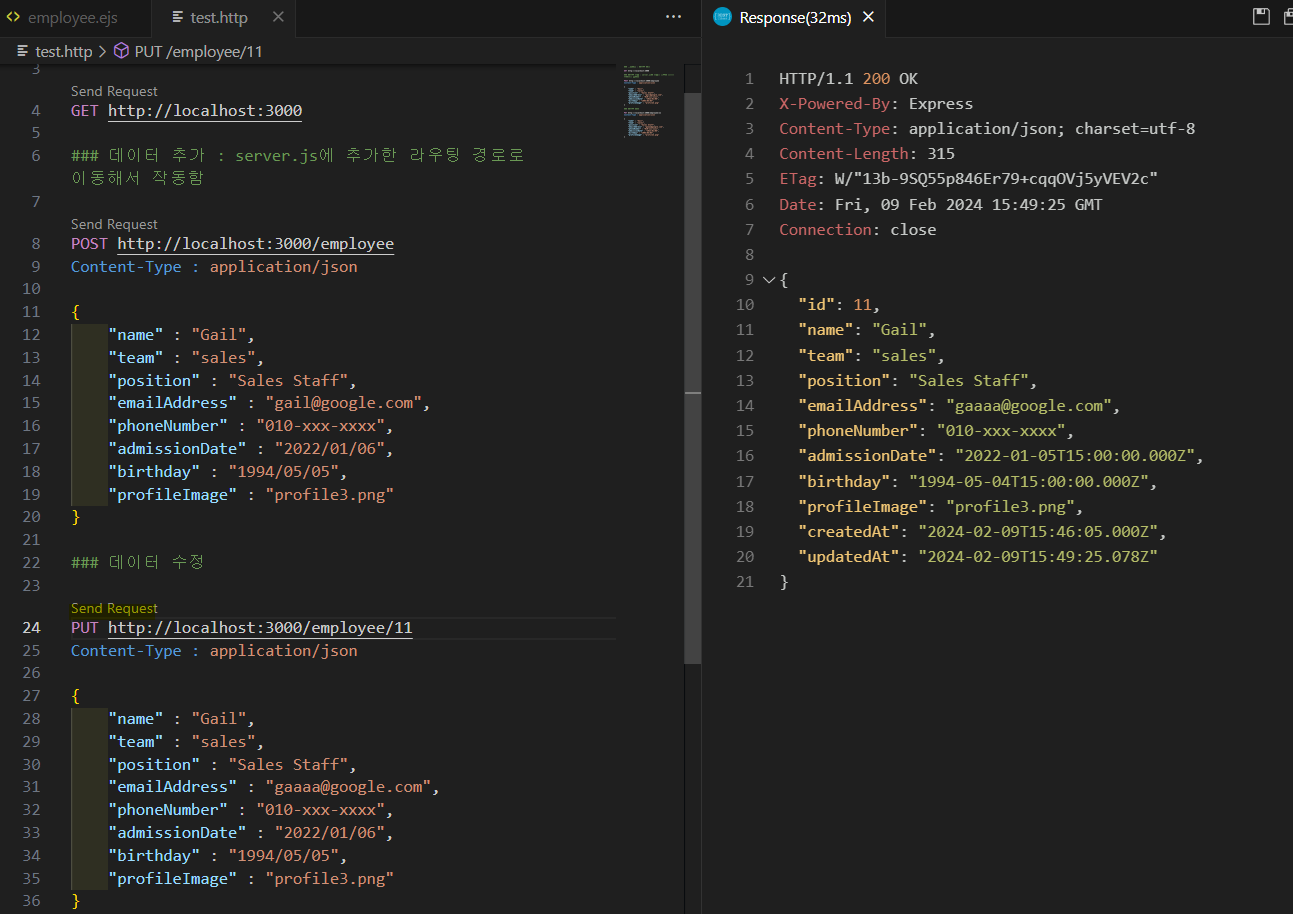
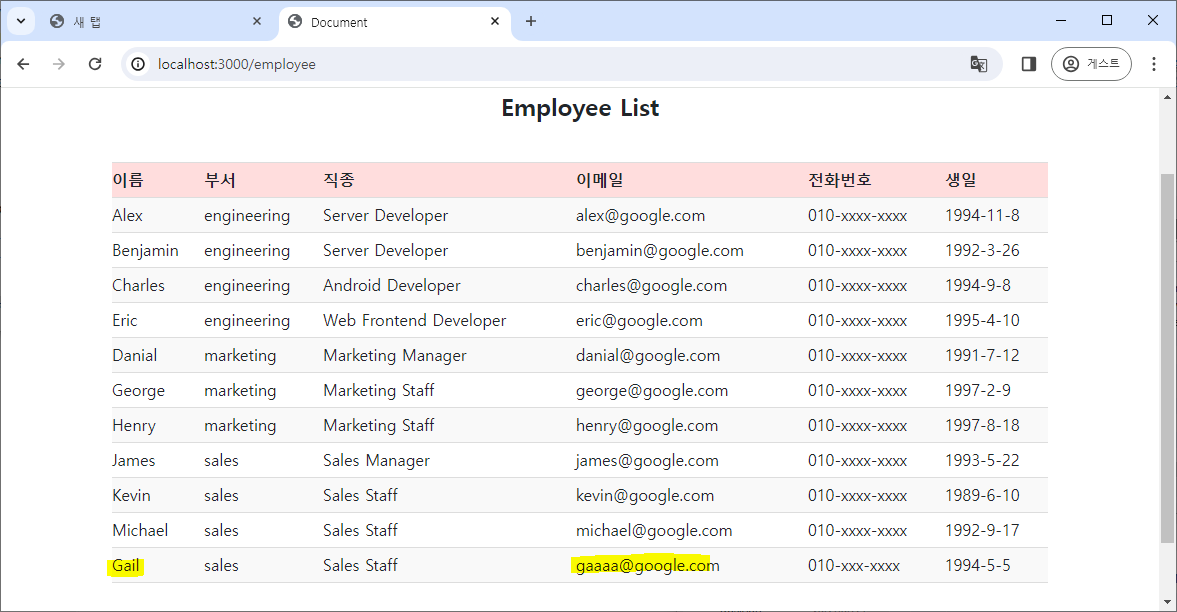
- 수정된 직원의 정보를 확인할 수 있다.
4. 데이터 삭제
- 데이터 삭제를 위한 delete 라우팅을 설정한다.
- Model query#DELETE 참고.
// 데이터 삭제
app.delete('/employee/:id', async (request, response) => {

    const { id } = request.params;
    const deleteCount = await Employee.destroy({where:{id}}); // 특정 조건의 행을 제거

    if (deleteCount) {
        response.send({message : '${deleteCount} row(s) deleted'});
    } else {
        response.status(404).send({message : 'Employee is not found'});
    }

});
- http 파일에서 데이터 수정을 위한 테스트용 request body를 작성한다.
- server.js에서 request.params을 받아 수정하는 방법으로 작성했기 때문에 PUT의 url에 params을 추가해야 한다.
### 제거
DELETE http://localhost:3000/employee/11
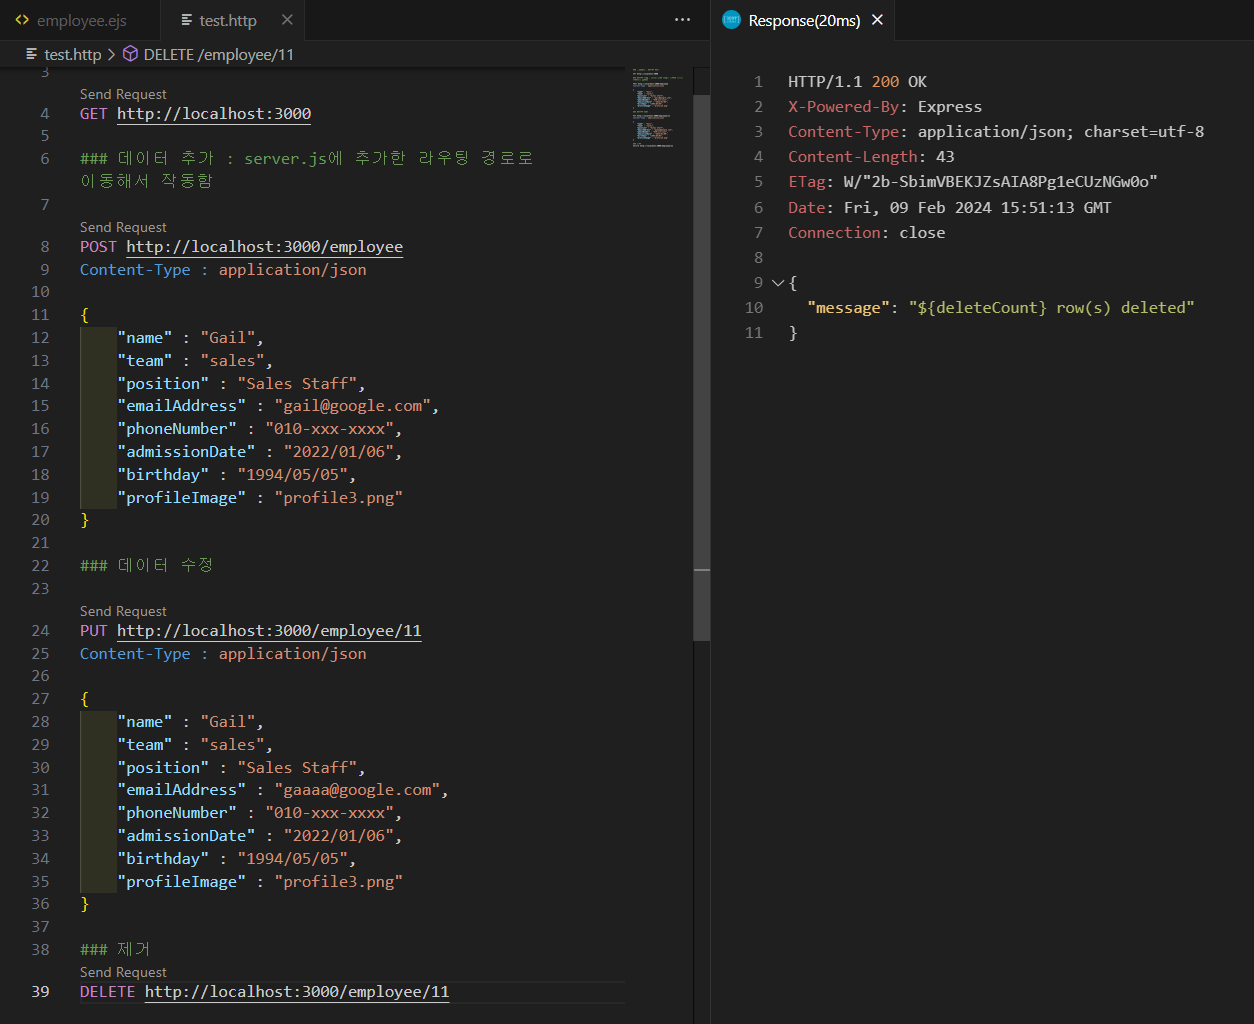
- 11번 직원의 정보를 제거해서 페이지에서도 삭제된 것을 확인할 수 있다.
기타 설정
-
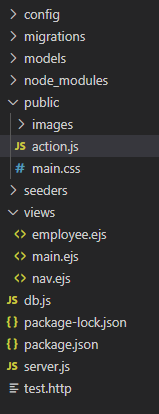
데이터를 조회할 때 query string을 사용해서 주고 받는 것을 이용해서 html의 select 태그, option 태그, input 태그, button 태그를 이용해서 특정 그룹의 직원이나 특정 id의 직원을 검색해서 조회하도록 html과 js를 수정한다.
- select 태그와 option 태그를 사용해서 특정 부서, 특정 직종을 선택할 수 있도록 만든다.
- 나중에 DB에서 부서, 직종 데이터를 가져와서 option 태그를 작성하는 js 코드를 작성한다면 각 option을 일일이 다 작성할 필요가 없을 것 같다.
- input 태그와 button 태그를 사용해서 특정 id를 검색할 수 있도록 만든다.
- select 태그와 option 태그를 사용해서 특정 부서, 특정 직종을 선택할 수 있도록 만든다.
-
express.js 사용 중에 js 파일을 html에 연결할 때 주의사항
app.use(express.static(__dirname + '/public'))을 설정하고, js 파일을 /public 폴더 안에 넣는다.- 다른 경로도 시도해봤는데 잘 해결되지 않아 css 파일을 두던 위치에 넣었더니 해결되었다.
- script 태그의 attribute에
type="text/javascript"를 추가해 js 파일의 MIME 타입을 설정해야 한다.- type이 빠진다면 웹 console에 MIME 오류가 뜬다.
- type이 빠진다면 웹 console에 MIME 오류가 뜬다.
- 직원 정보를 확인하고 조회할 .ejs를 만든다.
- html로 작성한다.
<!DOCTYPE html>
<html lang="en">
<head>
    <meta charset="UTF-8">
    <meta name="viewport" content="width=device-width, initial-scale=1.0">
    <title>Document</title>
    <link href="https://cdn.jsdelivr.net/npm/bootstrap@5.0.2/dist/css/bootstrap.min.css" rel="stylesheet" integrity="sha384-EVSTQN3/azprG1Anm3QDgpJLIm9Nao0Yz1ztcQTwFspd3yD65VohhpuuCOmLASjC" crossorigin="anonymous">
    <link href="main.css" type="text/css" rel="stylesheet">
</head>
<body>

    <section class="sec employee">
        <div class="container">
            <h2 class="title">Employee List</h2>
            <div class="row">
                <div class="col">
                    <div class="search">
                        <div class="option-box">
                            <label for="group">choose team or position : </label>
                            <select id="group">
	                            <!-- 선택하지 못하는 기본 option 태그 -->
                                <option value="search-info" class="search-info" disabled>-- choose team or position --</option>
                                <option value="total">total</option>
                                <optgroup label="team">
                                    <option value="engineering" class="team-option">engineering</option>
                                    <option value="marketing" class="team-option">marketing</option>
                                    <option value="sales" class="team-option">sales</option>
                                </optgroup>
                                <optgroup label="position">
                                    <option value="Server Developer" class="position-option">Server Developer</option>
                                    <option value="Android Developer" class="position-option">Android Developer</option>
                                    <option value="Web Frontend Developer" class="position-option">Web Frontend Developer</option>
                                    <option value="Marketing Manager" class="position-option">Marketing Manager</option>
                                    <option value="Marketing Staff" class="position-option">Marketing Staff</option>
                                    <option value="Sales Manager" class="position-option">Sales Manager</option>
                                    <option value="Sales Staff" class="position-option">Sales Staff</option>
                                </optgroup>
                            </select>
                        </div>
                        <div class="search-box">
                            <input type="text" id="search" placeholder="input employee id">
                            <button id="send-btn">send</button>
                        </div>
                    </div>
                    <div class="info-box">
                        <table>
                            <tr>
                                <th>이름</th>
                                <th>부서</th>
                                <th>직종</th>
                                <th>이메일</th>
                                <th>전화번호</th>
                                <th>생일</th>
                            </tr>
                            <tr>
                                <% for(let i = 0; i < employee.length; i++) {
                                        let date = new Date(employee[i].birthday);
                                        let birthday = `${date.getFullYear()}-${date.getMonth()+1}-${date.getDate()}`;
                                    %>
                                    <tr>
                                        <td> <%= employee[i].name %> </td>
                                        <td> <%= employee[i].team %> </td>
                                        <td> <%= employee[i].position %> </td>
                                        <td> <%= employee[i].emailAddress %> </td>
                                        <td> <%= employee[i].phoneNumber %> </td>
                                        <td> <%= birthday %> </td>
                                    </tr>
                                <% } %>
                            </tr>
                        </table>
                    </div>
                </div>
            </div>
        </div>
    </section>

    <script src="https://cdn.jsdelivr.net/npm/bootstrap@5.0.2/dist/js/bootstrap.bundle.min.js" integrity="sha384-MrcW6ZMFYlzcLA8Nl+NtUVF0sA7MsXsP1UyJoMp4YLEuNSfAP+JcXn/tWtIaxVXM" crossorigin="anonymous"></script>
    <script type="text/javascript" src="action.js" ></script>
</body>
</html>
- eventlistener 등록을 위한 js 파일을 작성해서 .ejs 파일에 연결한다.
- 부서 이름과 직종 이름을 DB로부터 바로 받아오면 코드가 훨씬 간결해질 것 같다.
- 아직 방법을 구상하지 못해 이 코드에선 html에 작성해둔 option 태그의 value를 가져와 배열에 저장했다.
-
select 태그와 option 태그 설정
- select 태그에 있는 특정 option을 선택했을 때 action이 일어나게 하려면 EventListener를 change 이벤트에 넣어야 제대로 적용되었다.
- 직원 조회 기본 페이지 링크를 employee_url로 설정한다. server.js에 있는 라우팅을 통해 전체 데이터를 조회해서 가져올 수 있다.
- html에 작성된 select 태그와 option 태그(부서, 직종)를 가져온다.
- 부서 이름과 직종 이름을 저장할 배열을 만들고, option 태그들의 value값을 각 배열에 나누어 저장한다.
- 현재 query string의 내용을 확인하기 위해
window.location.search객체를 사용하고, query string의 value 부분을 split()으로 분리한다.- query string에는 team=sales, position=Sales%20Manager와 같은 형식으로 되어 있고, 여기서 sales와 Sales%20Manager을 분리해서 각각 부서 이름과 직종 이름하고 비교할 예정이므로 변수에 저장한다.
- query string의 value와 동일한 value를 가지는 option 태그를 찾아 그 태그에 "selected"라는 attribute를 추가해 새로운 페이지로 이동했을 때 select 태그의 value를 페이지 조회 내용과 같도록 설정한다.
- 페이지가 새로 로딩될 때마다 기본 option 태그의 내용으로 select 태그의 value가 고정되어 어떤 option을 선택했는지 알기 어려워 이런 처리를 했다.
- 이제 EventListener에 현재 select 태그의 value가 부서의 value인지, 직종의 value인지 확인해서 각 항목의 flag를 만든다.
- 각 flag가 true일 때 맞는 url을 따로 설정해서 server.js의
app.get()에 원하는 query string이 전달될 수 있도록 만든다.
-
input 태그와 button 태그 설정
- 간단하게 확인하기 위해 id의 유효성 검사는 생략했다.
- button을 누르면 input 태그의 값을 url의 query string에 함께 추가하여 해당 페이지로 이동하도록 설정한다.
- server.js의
app.get()에서 원하는 query string이 전달될 수 있도록 만든다.
- server.js의
-
이전 코드에서 작동이 잘 안되는 부분이 있는데, 바로 id 값을 입력해서 특정 직원을 검색한 후 전체 직원을 조회하기 위해 total을 select 태그에서 선택하면 제대로 작동하지 않는다.
- select 태그의 Event Listener는 change일 때 작동하므로, 기본값이 total인 경우 작동하지 않는다.
- 이를 해결하기 위해 total이라는 value의 option 태그 위에 선택이 불가능한 option 태그를 하나 더 추가한다.
// 직원 정보 페이지의 기본 url
let employee_url = "http://localhost:3000/employee";

// 드롭다운 메뉴의 요소들
let group = document.getElementById("group");
let teamList = document.getElementsByClassName("team-option");
let positionList = document.getElementsByClassName("position-option");
let default_option = document.querySelector(".search-info");

// 검색창의 요소들
let search_box = document.querySelector("#search");
let send_btn = document.querySelector("#send-btn");

// 부서 이름과 직종 이름을 저장할 배열
let teamName = [];
let positionName = [];

// 현재 query string의 value에서 공백 특수 문자를 공백으로 변환
let currentQuery = window.location.search.split("=")[1];
if (currentQuery) {
  if (currentQuery.includes("%20")) {
    currentQuery = currentQuery.replace("%20", " ");
  }
}

// option 태그들의 페이지별 selected Attribute 설정
// 기본 option 태그를 선택 상태로 만들어 전체 검색을 위한 동작도 가능하게 수정
if (window.location.href === employee_url) {
  default_option.setAttribute("selected", true);
} else {
  default_option.setAttribute("selected", false);
}

// option 태그의 value를 가져와 부서 이름 배열에 이름을 저장
for (let i = 0; i < teamList.length; i++) {
  teamName[i] = teamList[i].value;
  if (currentQuery == teamList[i].value) {
    teamList[i].setAttribute("selected", true); // 현재의 query string의 value와 일치하는 option 태그를 selected 상태로 설정
  }
}

// option 태그의 value를 가져와 직종 이름 배열에 이름을 저장
for (let i = 0; i < positionList.length; i++) {
  positionName[i] = positionList[i].value;
  if (currentQuery == positionList[i].value) {
    positionList[i].setAttribute("selected", true); // 현재의 query string의 value와 일치하는 option 태그를 selected 상태로 설정
  }
}

// event listener
group.addEventListener("change", function () { // select 태그는 change일 때 설정이 잘 적용되었음
  let flag_team = false; // 부서 이름인지 확인하는 flag
  let flag_position = false; // 직종 이름인지 확인하는 flag

  // 부서 이름인지 확인
  teamName.forEach((el) => {
    if (group.value == el) {
      flag_team = true;
    }
  });

  // 직종 이름인지 확인
  positionName.forEach((el) => {
    if (group.value == el) {
      flag_position = true;
    }
  });

  // select 태그에서 선택한 내용이 부서인지, 직종인지, 전체인지 확인
  if (flag_team) {
    location.href = employee_url + "?team=" + group.value; // query string에 부서 정보를 전달
    flag_team = false; // flag를 다시 false로 변환
  } else if (flag_position) {
    location.href = employee_url + "?position=" + group.value; // query string에 직종 정보를 전달
    flag_position = false;
  } else if (group.value == "total") { // query string을 제거하고 전체 조회를 수행
    location.href = employee_url;
  }
});

// 직원 번호 입력창 설정
send_btn.addEventListener("click", function () {
  location.href = employee_url + "?id=" + search_box.value; // 버튼 클릭 시 직원 id를 query string으로 전달
});
- 직원 조회 첫 페이지에선 모든 직원을 조회하고, select 태그의 내용은 선택 불가능한 설명 option으로 뜬다.
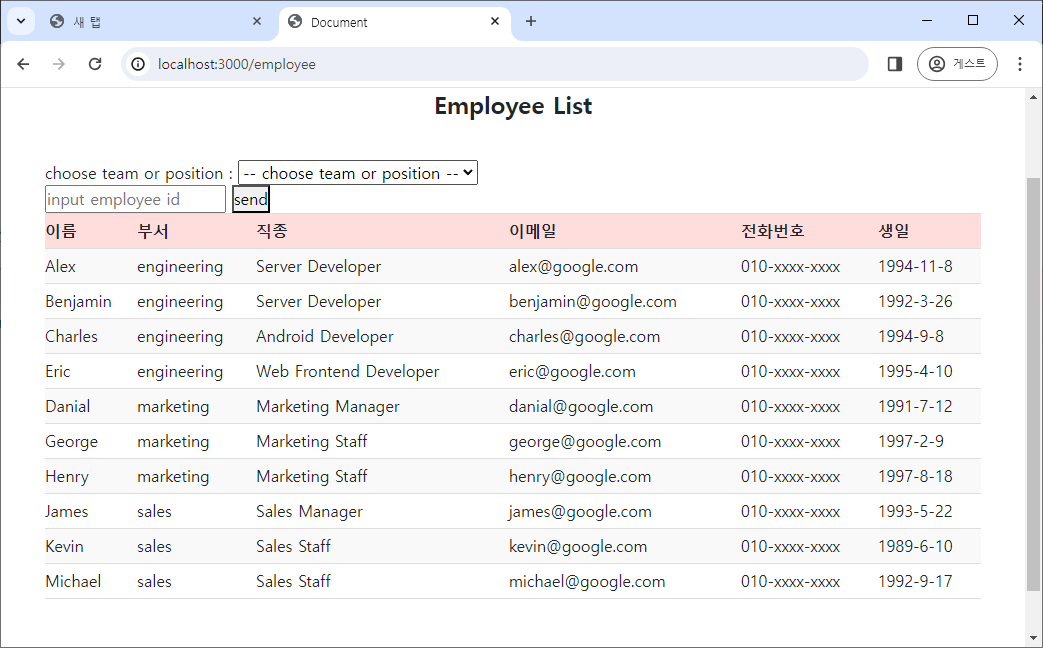
- select 태그에서 부서 중 하나를 선택하면 해당 부서의 인원을 DB에서 조회하여 출력한다.
- select 태그에서 직종을 선택하면 해당 직종의 인원을 DB에서 조회하여 출력한다.
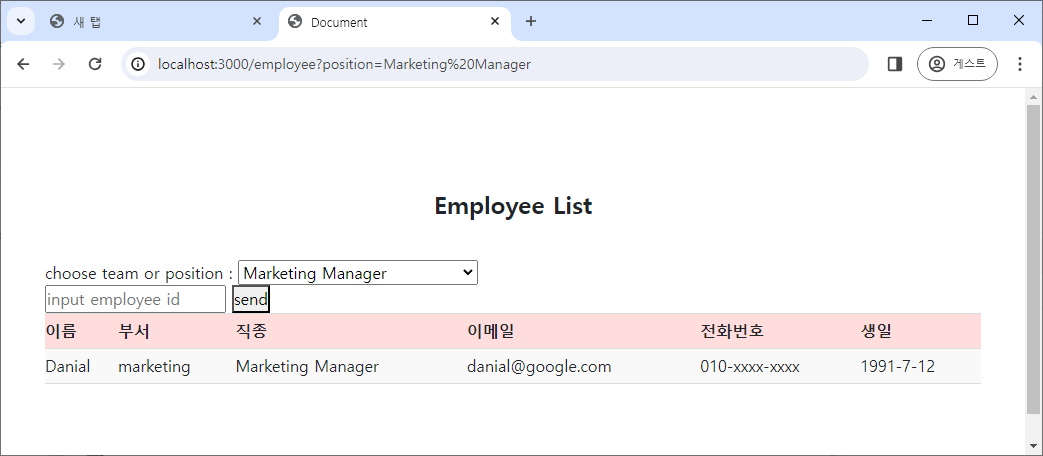
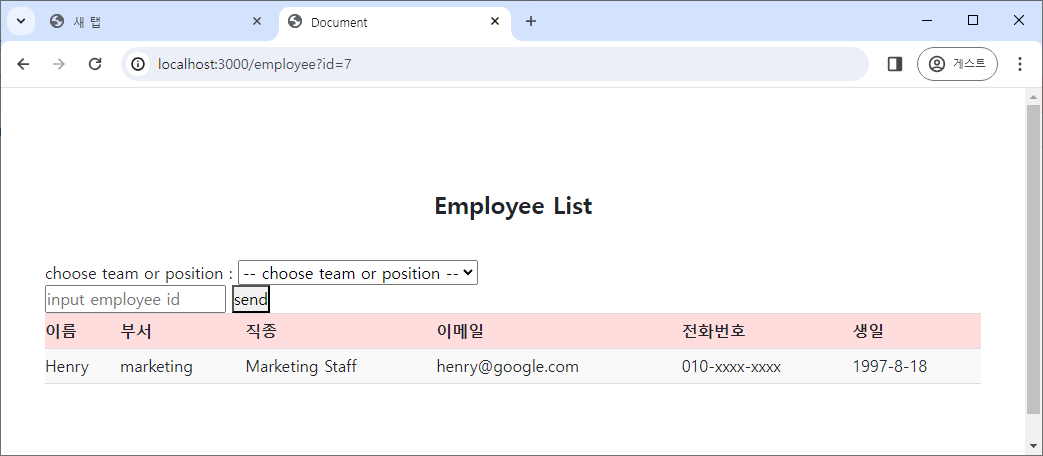
- 직원의 id를 input 태그에 입력하고 send 버튼을 누르면 해당 id의 직원을 조회한다.
날짜 형식 변경
.toLocaleString("ko-kr",{dateStyle:'long'})메소드를 사용하면 특정 지역의 날짜 형식대로 변경된다.- long : YYYY년 MM월 DD일
- short : YY. MM. DD
<!-- MySQL에서 가져온 날짜 형식을 변경 -->
employee.birthday.toLocaleString("ko-kr",{dateStyle:'long'});